
This guide shows you how to send the real-time AI face swap output from LiveFaceSwap Desktop to OBS for recording or streaming. In OBS, this output appears as the camera device LiveFaceSwap Camera.
Before you begin, make sure the LiveFaceSwap Windows app can already produce a live AI output. If you have not installed the app or completed your first face swap test, start here:
How to Use LiveFaceSwap Desktop on Windows 11
The complete video path is:
Physical Camera → LiveFaceSwap Desktop → OBS (select LiveFaceSwap Camera in OBS)
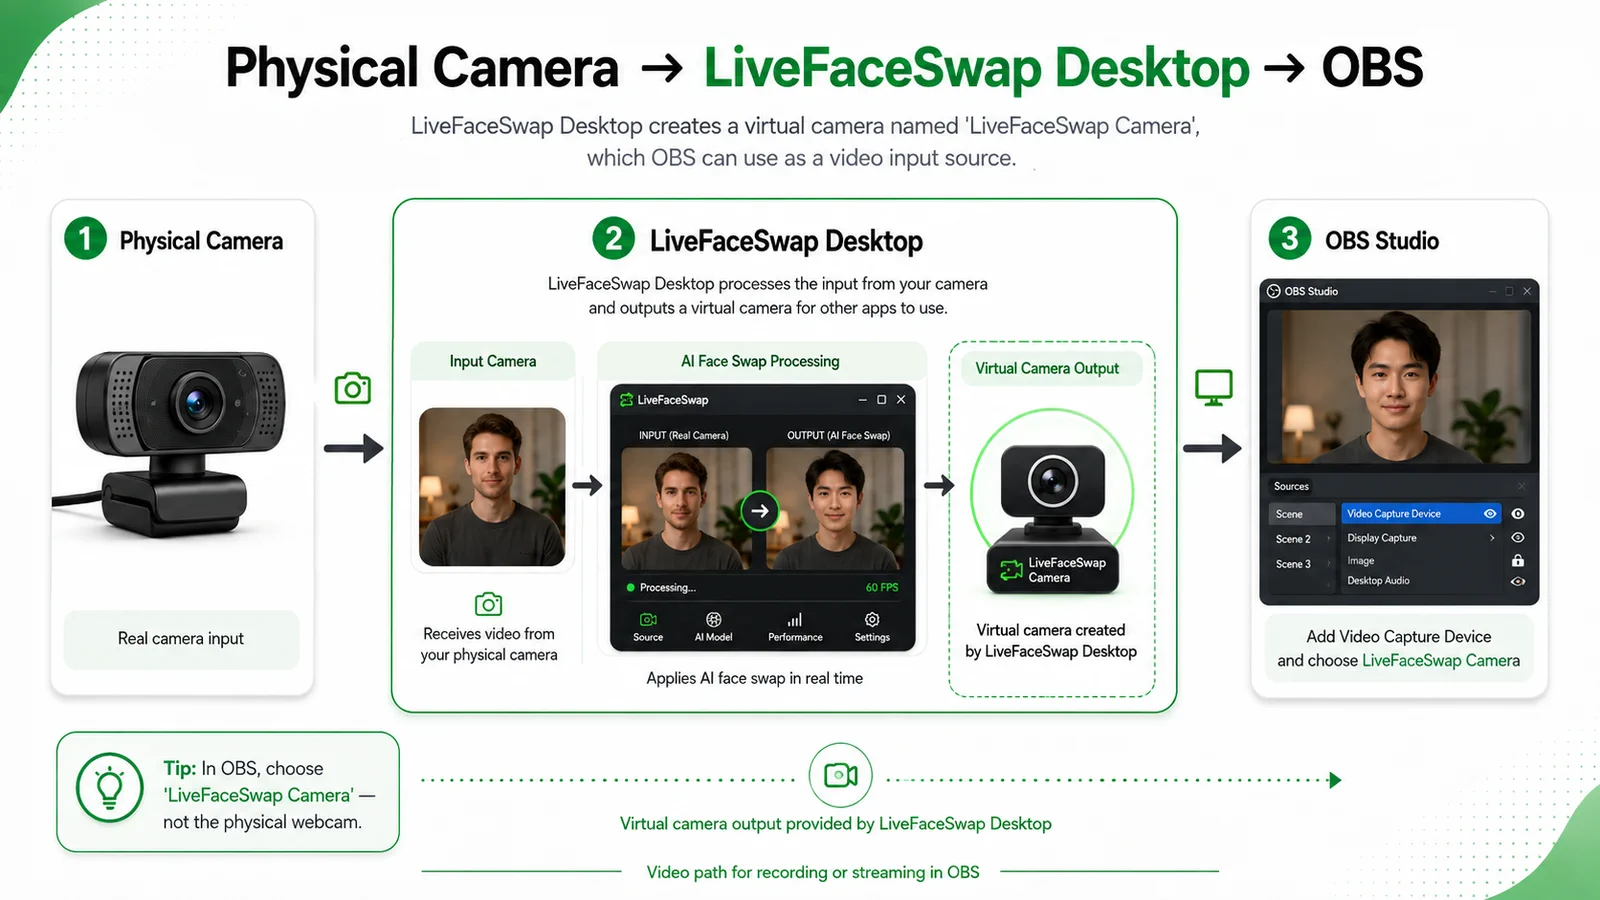
In this workflow:
- Input camera is the physical camera that sends video to LiveFaceSwap Desktop.
- In OBS, select LiveFaceSwap Camera. It is the virtual camera output installed with LiveFaceSwap Desktop, not a separate application.
Understanding the difference between these two devices helps prevent most OBS setup problems.
Before You Begin
Make sure that:
- LiveFaceSwap Desktop is installed.
- Your camera input works in LiveFaceSwap.
- You can see the live AI output after selecting Start Face Swap.
- OBS Studio is installed.
- LiveFaceSwap Camera was registered successfully when you installed LiveFaceSwap Desktop.
This guide is intended for Windows 11.
Use only reference portraits and camera feeds that you own or have permission to use. If the face-swapped content could mislead viewers, clearly disclose that it is AI-generated or altered in accordance with the rules of the platform you use.
1. Start the Face Swap in LiveFaceSwap
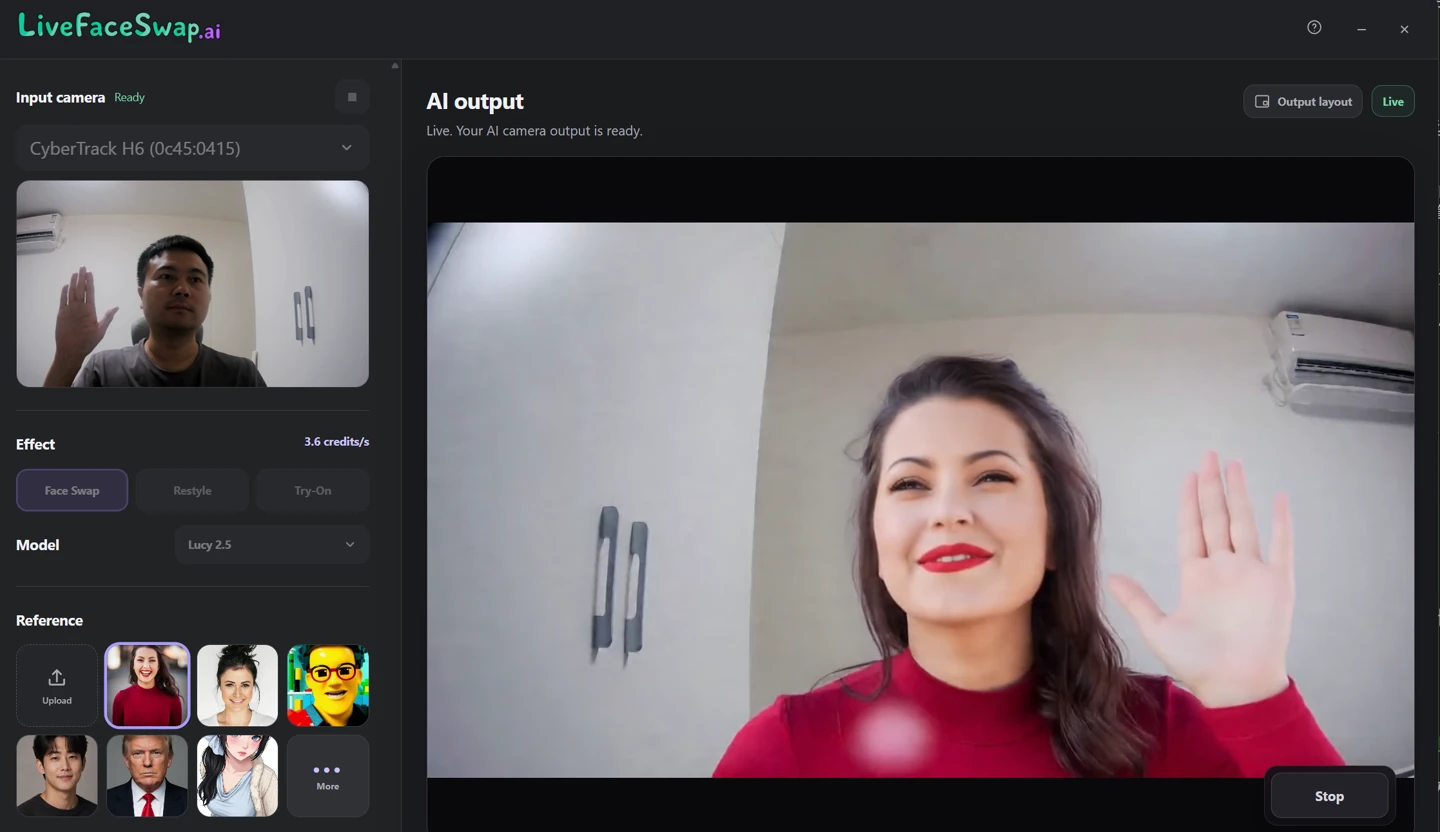
Open LiveFaceSwap Desktop, then:
- Select your physical camera under Input camera.
- Add a portrait under Reference.
- Under Effect, select Face Swap, then choose the AI model you want to use under Model.
- Select Start Face Swap.
- Wait for the processed video to appear under AI output.
Confirm that LiveFaceSwap Desktop is working before you configure OBS. If OBS does not receive a picture later, this makes it easier to tell whether the problem is with the AI session or the virtual camera output.
2. Add a Video Capture Device in OBS
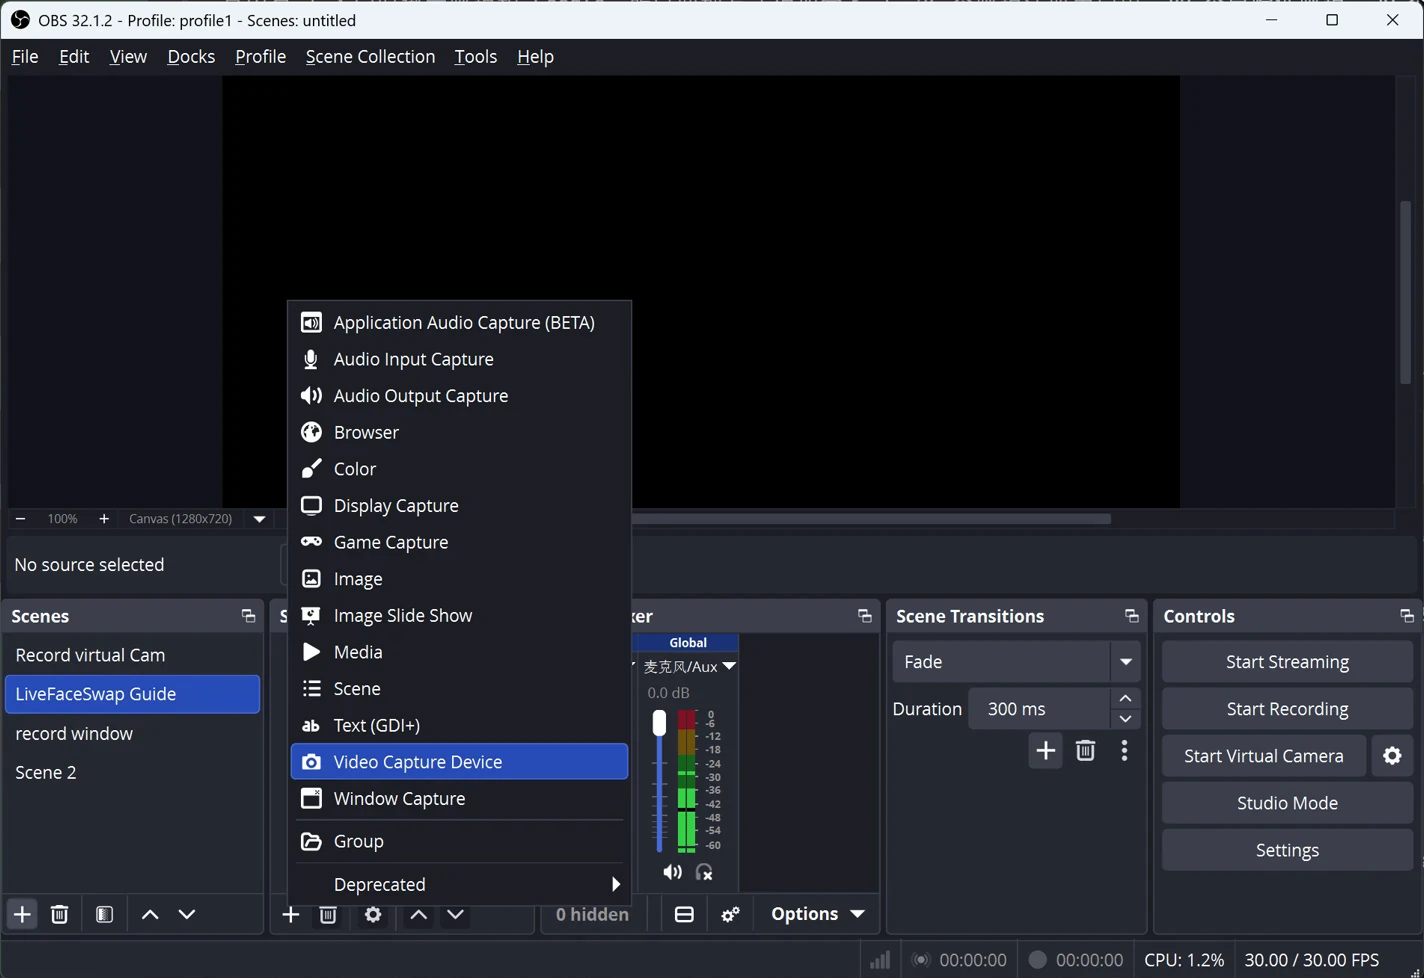
Open OBS Studio. In the Sources panel, select +, then choose:
Video Capture Device
Create a new source and give it a clear name, such as:
LiveFaceSwap
OBS will then open the properties for that video source.
3. Select LiveFaceSwap Camera as the Device
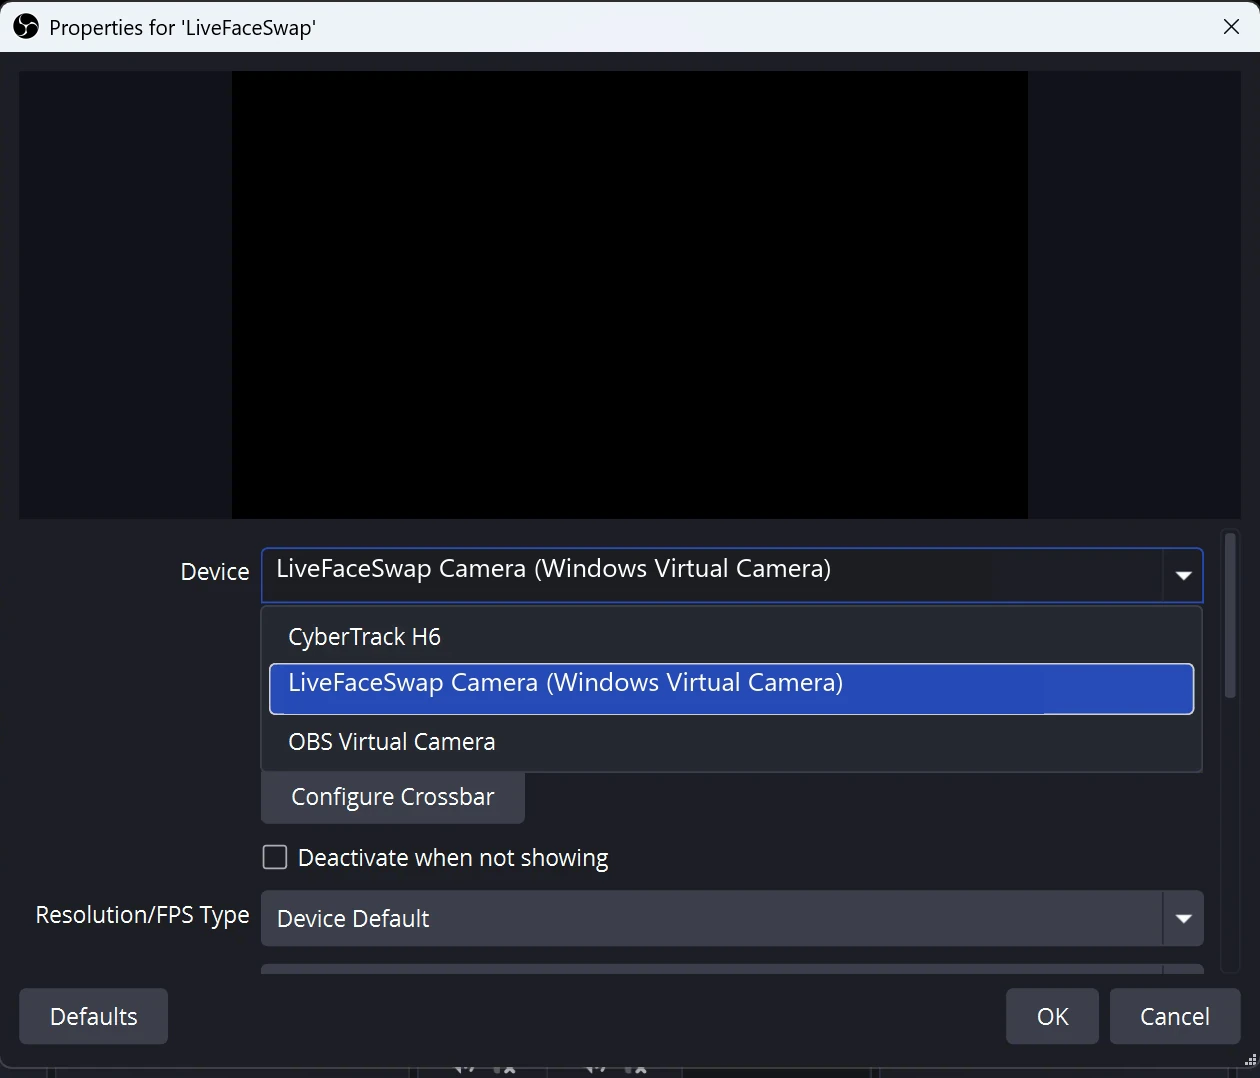
Open the Device menu and select:
LiveFaceSwap Camera
On some localized Windows systems, OBS may display the device as LiveFaceSwap Camera (Windows 虚拟摄像头).
This is not your physical webcam or a second LiveFaceSwap application. It is the virtual camera output installed and provided by LiveFaceSwap Desktop.
The correct video path is:
- Select your physical camera in LiveFaceSwap Desktop.
- LiveFaceSwap Desktop processes the video and exposes the result to Windows as LiveFaceSwap Camera.
- OBS receives that processed output when you select LiveFaceSwap Camera as its video device.
Do not select your physical camera again in OBS. If you do, OBS will receive the original camera feed instead of the AI-processed output.
4. Confirm That OBS Receives the Face-Swapped Video
After selecting LiveFaceSwap Camera, check that the OBS preview matches AI output in LiveFaceSwap.
Verify that:
- AI output in LiveFaceSwap Desktop continues to update.
- The video source in OBS is not black.
- The subject's movements appear in OBS.
- The OBS preview does not remain frozen on an old frame.
- OBS shows the AI output, not the original camera feed.
When both LiveFaceSwap Desktop and OBS continuously display the processed live video, the virtual camera connection is working.
Optional Setup: Video, Audio, Recording, and Streaming
Resize and Position the Video in OBS
After you add LiveFaceSwap Camera as a video source, you can resize and position it like any other camera source.
If the video does not fill the OBS canvas:
- Select the LiveFaceSwap source in the OBS preview.
- Drag its edges to resize it.
- Reposition it for your recording or stream layout.
- Check for unwanted cropping or black bars.
For a 16:9 landscape stream, fit the source to your current OBS base canvas resolution. For vertical video or streaming, create a vertical canvas and reposition LiveFaceSwap Camera to fit that layout.
Add a Microphone or Other Audio Source in OBS
LiveFaceSwap Camera is a video device and does not include microphone audio.
Add the audio sources you need separately in OBS, such as:
- Your laptop's built-in microphone
- A USB microphone
- An audio interface input
- Desktop Audio
- Another OBS audio source
LiveFaceSwap Desktop processes the live video. It does not configure your OBS microphone or streaming audio automatically.
Record Face-Swapped Video in OBS
Once OBS displays the LiveFaceSwap Camera feed correctly, you can use the standard OBS recording controls.
Select Start Recording to record the face-swapped video in the current scene together with any audio sources you have configured.
LiveFaceSwap Desktop provides a live video output; it does not automatically record, download, or export the current session. To save a video file, use OBS or another application that can record the LiveFaceSwap Camera feed.
Stream Face-Swapped Video with OBS
After you configure your OBS scene and streaming platform, you can use LiveFaceSwap Camera like a standard video source.
A typical streaming path is:
Camera → LiveFaceSwap Desktop → OBS → Streaming Platform
In OBS, select LiveFaceSwap Camera as the video source. It is the virtual output of LiveFaceSwap Desktop within this workflow.
Once OBS receives a stable LiveFaceSwap Camera feed, the remaining streaming setup is essentially the same as it is for any other OBS video source.
Before going live, make a test recording or run a private stream to check:
- Whether the AI face swap remains stable
- Whether the OBS aspect ratio is correct
- Whether the audio works
- Whether the network connection is stable
- Whether the audio and video stay in sync
Troubleshooting
OBS Cannot Find LiveFaceSwap Camera
If LiveFaceSwap Camera does not appear in the OBS Device list:
- Close OBS completely.
- Confirm that LiveFaceSwap Desktop is installed correctly.
- Reopen OBS.
- Create or edit the Video Capture Device again.
- Check the Device list.
For a full explanation of the virtual video device and separate microphone path, see the LiveFaceSwap Camera and audio guide.
If the device is still missing, run the LiveFaceSwap installer again.
If Windows reports that the device is in use while the virtual camera is being installed or updated, close OBS, video-conferencing software, and any other app that may be accessing a camera, then retry the installation.
OBS Finds LiveFaceSwap Camera, but the Preview Is Black
If OBS lists LiveFaceSwap Camera but does not display video:
- Return to LiveFaceSwap Desktop.
- Confirm that the physical feed under Input camera works.
- Select Start Face Swap and wait for AI output to appear.
- Return to OBS and select LiveFaceSwap Camera again.
- If the preview is still black, remove the Video Capture Device and add it again.
If the problem continues, close both OBS and LiveFaceSwap, reopen them, and test again.
The OBS Preview Freezes or Stops Updating
If AI output continues to update in LiveFaceSwap Desktop but the OBS preview freezes:
- Select Stop in LiveFaceSwap.
- Select LiveFaceSwap Camera again in OBS.
- Select Start Face Swap again.
- Check whether the OBS preview resumes.
Restart OBS if the preview remains frozen.
OBS Shows the Original Camera Instead of the Face Swap
Check which video device is selected in OBS. The correct device is:
LiveFaceSwap Camera
Do not select a physical camera such as:
- Integrated Camera
- USB Camera
- Webcam
- Another physical camera name
Select the physical camera under Input camera in LiveFaceSwap Desktop. OBS should receive the virtual output from LiveFaceSwap Camera.
Can I Use LiveFaceSwap Camera with Zoom, Teams, or Other Apps?
Yes. An application that supports selectable camera inputs can usually use LiveFaceSwap Camera directly without going through OBS.
Look for LiveFaceSwap Camera in the camera settings of your video-conferencing, recording, or streaming application. Virtual camera support can vary by application and version, so test the complete setup before using it in a live session.
OBS Has Video but No Audio
This is expected.
LiveFaceSwap Camera provides video only. It does not include microphone audio.
Add Audio Input Capture or another audio source in OBS, then select your microphone or audio interface.
Collect Logs for Further Troubleshooting
If an OBS or virtual camera problem persists, open the account menu in LiveFaceSwap Desktop, then:
- Open App & updates.
- Check for an available update.
- Select Open logs.
- Open the local log folder.
Send the log files, the device status shown in OBS, any error messages, and screenshots of the problem to support@livefaceswap.ai.
This information can help determine whether the problem involves:
- The LiveFaceSwap installation
- The LiveFaceSwap Camera virtual camera
- The physical camera
- The live AI session
- The OBS video source
- The network connection
After completing the OBS setup, you can also use LiveFaceSwap Camera with other applications that support camera input.